Thursday 27 November 2014

FANTASTIC NEWS!

Hi Everyone!

Razzle Dazzle Rose have some FANTASTIC NEWS to share with you all!

We are proud to announce that we have won an award for BEST stationery in the 2014 perfect wedding magazine awards! 


The award ceremony was held in London at the Drury Club in Covent Garden. The theme was 'Razzle Dazzle 'em 1920's glitz and glam!  

pictured: Sharon Langsdale, Razzle Dazzle Rose Business owner, and Peter Langsdale ( Hubby!).

We were absolutely delighted the judges voted us into the top 5 in the best wedding stationery category out of hundreds of businesses that entered. Once the judges announced the finalists, it was all down to public vote.

Thank you so very much to all the lovely brides and grooms who voted for us over the past couple of months

Each and every vote counts to be able to win this fantastic award, and we are delighted to have won xxx 


Giftwrapped Book Launch - Waterstones Lincoln

Hi Everyone!

 Last week I attended the book launch at Waterstones in Lincoln for the launch of 'Giftwrapped' Jane Means' new and totally gorgeous gift wrapping book. 

We were delighted when Jane asked us to provide our paper doilies to be featured in the book, and even more delighted when we saw how many fantastic gift wrapped items included our paper doilies!


Here's a selection of photos taken on the night, and a great photo of me and Jane! 

 You can purchase the book direct from Jane's website here: 

http://www.janemeans.com/gift-wrapping-book-c-266.html 

 Signed copies are extremely limited! buy yours now while stocks last - you won't regret it!

Thursday 30 October 2014

Mini Handbag Tutorial


Mini Handbag Tutorial


Hi Everyone


Are you crafting for Christmas, or preparing for a Winter wedding? Today we've got a lovely little tutorial for you using our brown kraft mini handbags. With a little ribbon, a paper flower and some double sided tape, these gorgeous little gift bags can be all yours.

 Here's what you need:
  • Mini handbags from Razzle Dazzle Rose
  • Brown kraft paper flower kit from Razzle Dazzle Rose
  • Sharpe Scizzors
  • Assorted Red ribbons from Jane Means
  • Stix 2 double sided tape
All our bags and boxes come pre scored and flat for you to assemble. Add a strip of double sided tape to the inside of each left and right of the card flaps like this:


Remove the red part of the double sided tape, lift and adhere to the inside of the handbag like his:


Fold in the two inner card flaps, they are pre scored to make life a little easier 


Before you add your content, and close the handbag top, add your ribbon by threading through the two holes from the inside of the top flap. 

Add your choice of ribbon, twine, or lace. Tie a knot in both sides of the handbag to form the bags handle.


We love them with Jane Means Red and cream striped grosgrain ribbon or the red stitched ribbon like we have made here ...


Or with some of our crochet lace, a paper flower and a mini tag, the choice is yours!  


The handbags are a perfect size add a ferrero rocher chocolate too!

All products are available from www.razzledazzlerose.co.uk
and
www.janemeans.com


Wednesday 15 October 2014

Giftwrapped - New Book Release


Giftwrapped - New Book Launch!


Hi Everyone...

Sorry I haven't been blogging much lately, so much has happened here at Razzle Dazzle Rose! We have been really busy selling our gorgeous wedding stationery and gifts, and preparing for Christmas. Apologies to you all for not adding any tutorials for a while; there are plenty of amazing goodies to share with you over the next couple of weeks.

The exciting news is finally out! Back in June I was asked to provide Jane Means with some of our pastel doilies for a book that Jane was creating. Well, the book is now available!  Our doilies have been used in several of Jane's projects in the book and look absolutely fantastic. The giftwrapped book is full of inspirational projects and ideas, of how to wrap the perfect present. A perfect Christmas gift for fellow crafters!

All projects are shown with clear and easy-to-follow step-by-step instructions. Giftwrapped delivers inventive ideas and designs along with the all-important know-how, so that you can create your own magical parcels whatever the occasion or celebration whether Christmas, birthday or wedding favour.


Do you want a signed copy? Then grab one quick, the books can be purchased on Jane's website at: www.janemeans.com.


Friday 8 August 2014

Mini Journal Kits


                                 Mini Autumn Journals


With the sun shining everyday here in the UK, long summer nights and perfect barbecue weather, we were thinking of the next seasons and all that Autumn has in store for us.  I was recently asked by Crafts Beautiful magazine to make something with our brown kraft card, but with a rustic Autumnal theme. 


And this is what we ended up with! A gorgeous little mini journal kit. The journal kits were an idea I had with luggage tags - we joined them together and created into a concertina journal. We designed the backing papers, added little frames for you to mount your photographs and autumn memories, added a leaf for the front, and threaded some gorgeous bright orange and brown Jane Means ribbon and twine; we even added some journalling words for you all as well.

The kits all fit into a cute little brown kraft box too, and we think they are a really nice keepsake album for bonfire night, Halloween and for preserving memories of wonderful autumnal walks whilst kicking leafs and looking for conkers!

The kits are available on our website for £9.99 each, and can be purchased here.

Jane Means Ribbon is included in the kit, but additional supplies can be purchased here.

We LOVE the mini journals so much, that we are now working on baby journals, Christmas memory journals, Summer Holiday journals, and wedding journals too!

Hope you like them... Bye for now xx

Tuesday 27 May 2014


Kraft Matchbox Tutorial

Hi Everyone

Today we have added two new products to our website to share with you. We've made some brown kraft matchboxes, added our new ribbon tags, and decorated them with some fabulous Jane Means Ribbon, follow this simple tutorial to find out how to make them.


We have two sizes of matchboxes, the mini matchbox is shown above, and decorated here:


Perfect for little wedding favours filled with chocolate beans or confetti, or for holding all those little loose buttons that you find in your kitchen drawers.


 Here's how easy they are to make:


For each box, there are two pieces, the part that forms the main box; and the part that forms the sleeve.


The sleeve and the box are both pre- scored ready for you to assemble. Simply bend the score lines, and add a strip of double sided tape to the flap like this.


The main box part looks a little tricky at first with all the flaps, but trust me, it's really easy!

Fold all the pre scored flaps inwards, this will make the next step a little easier.

There's no glue needed for the main box part, all you need to do is fold and tuck the flaps under each other, so there are no flaps left. The 4 little side flap need to tuck and fold under the 4 side folds - (hope that makes sense? )See my photo above.


Slide the outer cover over to box, and then you are ready to decorate your lovely matchboxes.

You can add a little crochet ribbon with a luggage tag, perfect for wedding  gifts or favours, or for little birthday / Mothers day gifts. 

The large boxes would be great to use if you have some earrings or a necklace to give as a gift, and not quite sure how to wrap them.  Simply wrap them in tissue paper, pop them in the matchbox and decorate with your favourite ribbon.


We simply love the bubble gum pink and brown polka dot ribbon from Jane Means, which threads perfectly through our personalised ribbon tags.


How will you decorate yours?

Where to buy:

Matchbox kits : here 
Personalised ribbon tags : here 
Jane Means Polka Dot Ribbon : here

Happy Crafting folks!

Friday 23 May 2014

Pocketfold Wallet with lace Tutorial


Pocketfold Wallet With 
Wide Lace Tutorial


Hi Everyone! 

We have had masses of enquiries asking how to decorate our popular pocketfold wallets, and therefore this little tutorial is for you all x

Our square pocketfold wallets come flat, unassembled and ready to decorate. They are really popular at the moment when decorated with white wide lace, burlap and little tags.


Our pocketfold wallets are pre creased and flat, so in order to assemble, follow these simple steps:


Fold the two little flaps in and rub over the crease lines to fold. You need to add thin strips of double sided tape on the top part of the flap ( not on the bottom otherwise your 'pocket' won't stick to the rest of the wallet!). 


Lift and press to adhere like this:


That's your wallet made, now it's time to decorate, please pay close attention to the next steps to get the result looking really good!


Add a thin layer of double sided tape all round the front and the back of the wallet, this will help keep the lace in place, and prevent it from sliding up and down the wallet. We recommend our stix 2 double sided tape pens for all card assembling and not glue, most glues are too runny and may crinkle or ripple the card!


Cut a strip of wide lace, we used our Rose wide lace, available from our shop. Try and cut the lace so it meets at the back, it doesn't have to look great, or be cut straight, you will find out why shortly...


Check the front of the wallet to make sure the ribbon is central on the card fold and straight!


Do the same process again by adding double sided tape on top of the wide lace, try and make sure when adding the burlap ribbon, it is central with the wide ribbon. 


Third layer, repeat steps 1 and 2 with thin white satin ribbon.


Here's the bit to really pay attention to...  When you have added all the ribbon, burlap and lace, it all looks messy doesn't it? Even though it's the back of the front flap, people will still see it when they open the wallet. If you cut a piece of brown kraft card that measures 145mm x 145mm, and add some more double sided tape to the back of the card piece, all round the sides and a bit in the middle, and place it on top of the messy ribbon, it will hide all those ugly pieces of cut ribbon. 

If you don't feel comfortable cutting the card, simply purchase our pocketfold insert cards, they're the exact size needed for the actual invite, etc. You can buy them from us blank or printed with your wedding details - the choice is yours.


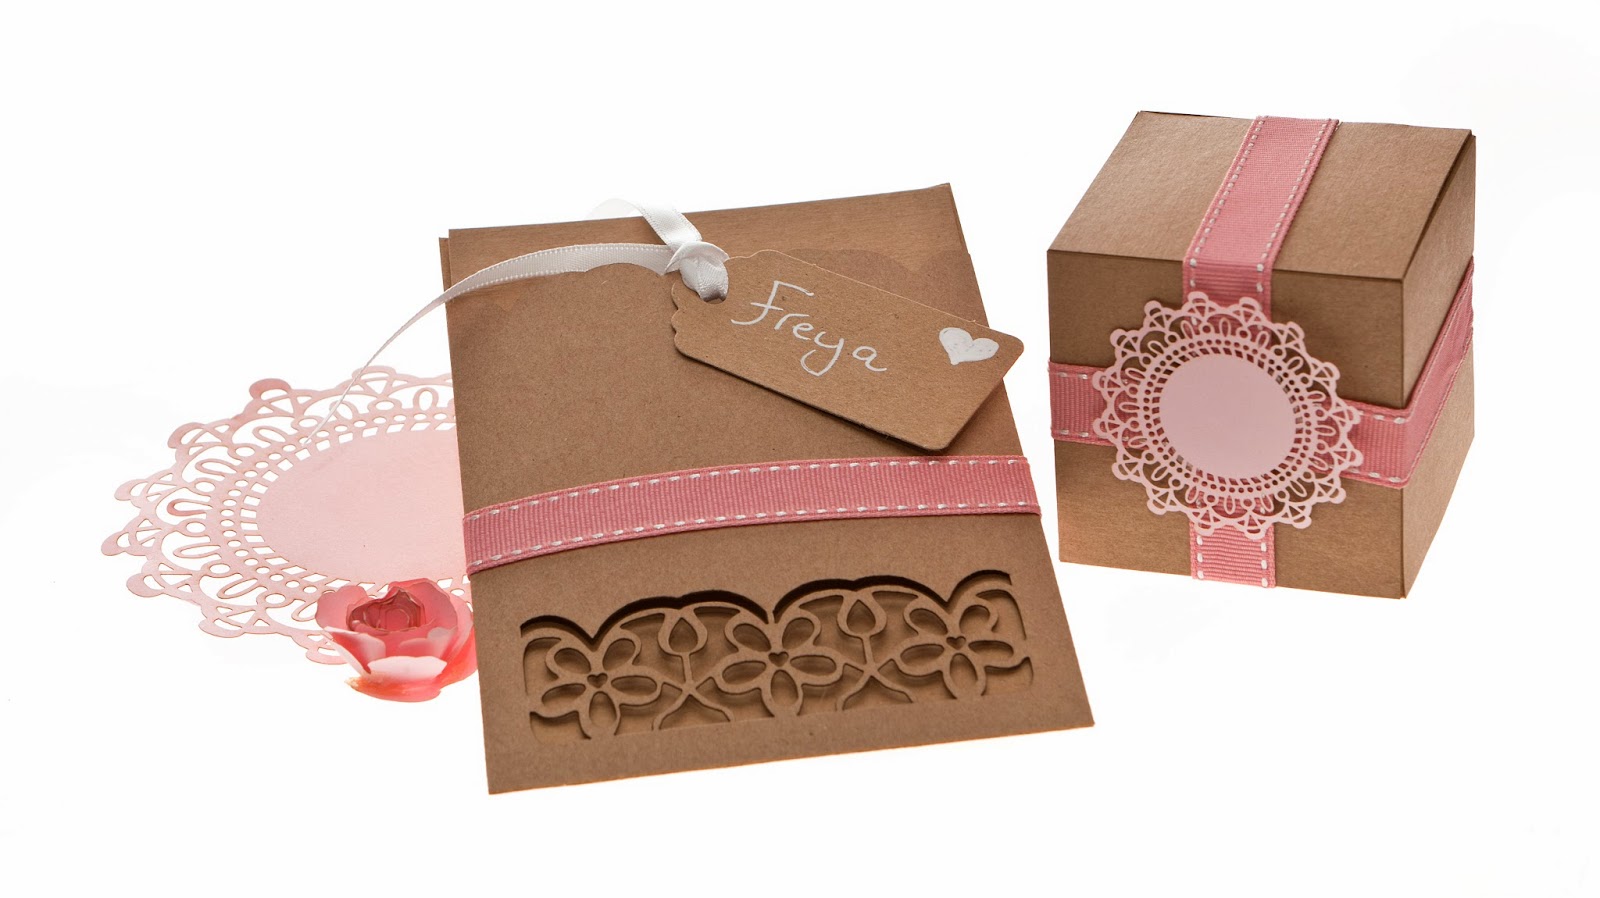
We tied a little bow and added to the front of the wallet, and added one of our rectangular personalised tags to complete.


Simply Beautiful !

All items are available on our website, www.razzledazzlerose.co.uk

If you have any further questions still - please ask...

Sharon@razzledazzlerose.co.uk


Tuesday 20 May 2014

NEW ! Recycled Greeting Card Kits


Tutorial for Laser Cut Recycled Kraft Card Kits


We have launched our new range of recycled kraft cards kits on our website.

Here’s a simple tutorial of how to make these gorgeous cards. With a few easy steps, our recycled card kits can be recreated within minutes.


In your recycled kraft card kit, you will find all the items required to make 16 greeting cards.

The card kits comprise of folded cards and envelopes, laser cut toppers, backing paper, foam pads, greeting tags and embellishments. 

Please note: The embellishments, backing paper and laser toppers vary depending on which kit pack you purchase.

Take one of the laser cut toppers with the shapes already cut out, we have chosen the daisy cut topper from the assorted greeting card pack.


Choose one of the coloured backing papers,  this is to be adhered to the back of the topper card.  The backing papers are already cut to size for you.  Add strips of double sided tape to the front patterned side of the backing paper, and place on the back of the topper card. This allows the coloured card to show through the laser cut designed topper.  


Next, add the foam square pads all around the edge of the back of the topper card. This will give height and dimension to your card. 


Place the topper card on top of your 6 x 6 folded blank card from the kit, ensuring you leave space for your tag and embellishment.   


Add your chosen greeting tag from the selection in the kit, using the foam pads again to add dimension. 


The paper flowers in the kit add a great finishing tough to the greetings card. Simply start from the end, and gently roll the petal on the flower until your reach the middle.


Once you have reached rolling to the end of the paper flower, add a little double sided tape to the bottom part of the flower.


To finish, make little bow from the twine in the kit, add to the folded card, then place the flower on top of the bow to complete.


You'll need:
both available from www.razledazzlerose.co.uk

The full range of Recycled greeting card kits are :

Assorted Greeting card kit
Mens Range
Christmas Range
Baby Announcement (girls and boys kits available)

Happy Crafting!!


Monday 24 February 2014

Laser Cut Sleeves


Hello Everyone,

The sun has been shining today, and we're feeling in a spring mood! We have been busy designing some new products and thought we would share one of our NEW laser cut sleeves and favour boxes with you. 

The Laser Cut Sleeves are available from my website here:


The adorable laser cut sleeves come flat, ready for you to assemble, (all you need to do is add a little double sided tape to each of the inside flaps shown to stick together) 

We decorated them with some gorgeous 15mm reversible stitched Salmon Pink grosgrain ribbon. Available from www.janemeans.com.


Starting from the middle of the back of the sleeve when the sleeve has been made up, add a straight line of double sided tape, bring the tape around the front, and bring around the back of the sleeve to meet in the middle where you started. 
Repeat the process with the ribbon, by peeling back the double sided tape top layer and add the ribbon and wrap around the back. With a sharp pair of scissors, cut the ribbon straight at the tape join and press down lightly for the ribbon to stick to the tape.

We used our pastel pink mini doilies to decorate our kraft boxes, and matching Salmon Pink ribbon to complete the set.


The wallets have a small hole in the front, and come with free mini luggage tags. They can be used as a menu place settings at your wedding reception, or as a really unusual and unique way of giving a wedding invitation to your guests. The wallets can hold up to 5 pieces of card, for your invitation, RSVP, venue or travel information. 

The wallets are also available in vintage cream fleck. 


We also decorated some mini vintage milk bottles with our mini doilies, filled the jars with chocolate dragees, and added a name - we think they make perfect little table favours!


BLOG DESIGN BY DESIGNER BLOGS