Tuesday, 20 May 2014

NEW ! Recycled Greeting Card Kits


Tutorial for Laser Cut Recycled Kraft Card Kits


We have launched our new range of recycled kraft cards kits on our website.

Here’s a simple tutorial of how to make these gorgeous cards. With a few easy steps, our recycled card kits can be recreated within minutes.


In your recycled kraft card kit, you will find all the items required to make 16 greeting cards.

The card kits comprise of folded cards and envelopes, laser cut toppers, backing paper, foam pads, greeting tags and embellishments. 

Please note: The embellishments, backing paper and laser toppers vary depending on which kit pack you purchase.

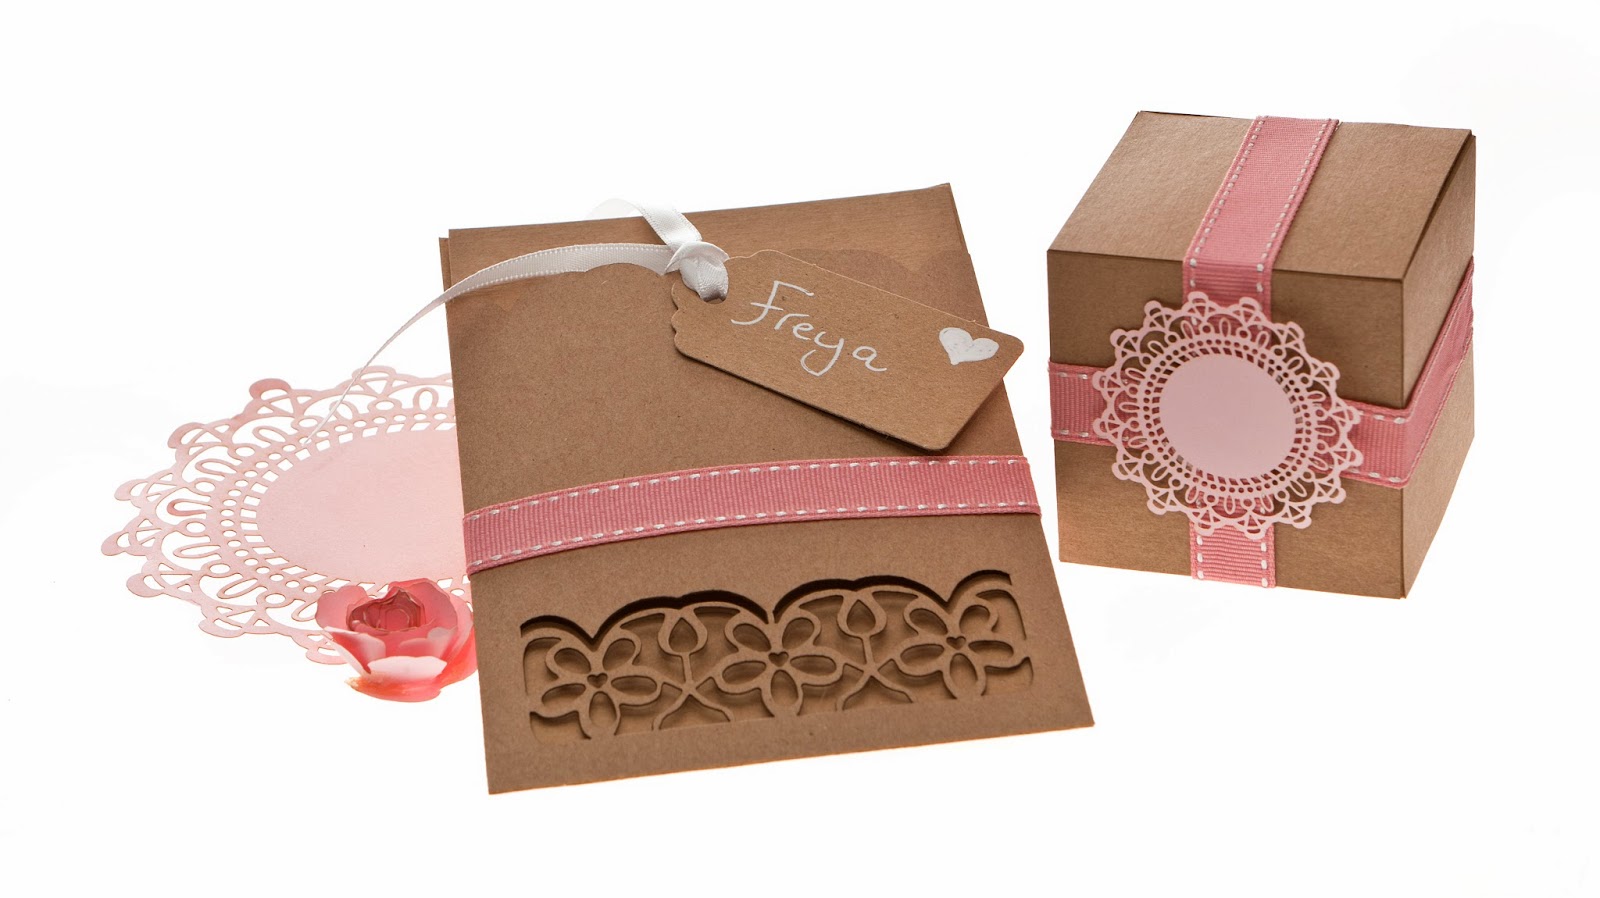
Take one of the laser cut toppers with the shapes already cut out, we have chosen the daisy cut topper from the assorted greeting card pack.


Choose one of the coloured backing papers,  this is to be adhered to the back of the topper card.  The backing papers are already cut to size for you.  Add strips of double sided tape to the front patterned side of the backing paper, and place on the back of the topper card. This allows the coloured card to show through the laser cut designed topper.  


Next, add the foam square pads all around the edge of the back of the topper card. This will give height and dimension to your card. 


Place the topper card on top of your 6 x 6 folded blank card from the kit, ensuring you leave space for your tag and embellishment.   


Add your chosen greeting tag from the selection in the kit, using the foam pads again to add dimension. 


The paper flowers in the kit add a great finishing tough to the greetings card. Simply start from the end, and gently roll the petal on the flower until your reach the middle.


Once you have reached rolling to the end of the paper flower, add a little double sided tape to the bottom part of the flower.


To finish, make little bow from the twine in the kit, add to the folded card, then place the flower on top of the bow to complete.


You'll need:
both available from www.razledazzlerose.co.uk

The full range of Recycled greeting card kits are :

Assorted Greeting card kit
Mens Range
Christmas Range
Baby Announcement (girls and boys kits available)

Happy Crafting!!


Monday, 24 February 2014

Laser Cut Sleeves


Hello Everyone,

The sun has been shining today, and we're feeling in a spring mood! We have been busy designing some new products and thought we would share one of our NEW laser cut sleeves and favour boxes with you. 

The Laser Cut Sleeves are available from my website here:


The adorable laser cut sleeves come flat, ready for you to assemble, (all you need to do is add a little double sided tape to each of the inside flaps shown to stick together) 

We decorated them with some gorgeous 15mm reversible stitched Salmon Pink grosgrain ribbon. Available from www.janemeans.com.


Starting from the middle of the back of the sleeve when the sleeve has been made up, add a straight line of double sided tape, bring the tape around the front, and bring around the back of the sleeve to meet in the middle where you started. 
Repeat the process with the ribbon, by peeling back the double sided tape top layer and add the ribbon and wrap around the back. With a sharp pair of scissors, cut the ribbon straight at the tape join and press down lightly for the ribbon to stick to the tape.

We used our pastel pink mini doilies to decorate our kraft boxes, and matching Salmon Pink ribbon to complete the set.


The wallets have a small hole in the front, and come with free mini luggage tags. They can be used as a menu place settings at your wedding reception, or as a really unusual and unique way of giving a wedding invitation to your guests. The wallets can hold up to 5 pieces of card, for your invitation, RSVP, venue or travel information. 

The wallets are also available in vintage cream fleck. 


We also decorated some mini vintage milk bottles with our mini doilies, filled the jars with chocolate dragees, and added a name - we think they make perfect little table favours!


Sunday, 23 February 2014

Decorative Wreath Tutorial

Decorative Paper Wreaths

Hello All!

Today we have a free tutorial for our beautiful decorative paper wreath kits. Here at Razzle Dazzle Rose, we believe that wreaths should be an all round annual decoration in your house, and not just hung on your door or porch to celebrate Christmas!

We have designed a beautiful step by step tutorial for you to recreate your own version. The wreaths so easy to make;  A few simple origami paper folds on long strips of paper or card and a little glue card is all it takes!  Kits are available from our website here: http://www.razzledazzlerose.co.uk/decorative-wedding-wreaths-92-c.asp


In the kit you will find the following:
3 rings of heavy card
70 strips of paper or card (depending on which kit you purchase)
1 metre crochet lace
1 paper flower
(Glue and scissors not included)

Here’s how to make:

Start by glueing the rings together, this will help make the base that you are going to wrap the strips around firmer. We recommend our stix2 high tack glue as it only takes 7 seconds to stick together!


In the kit you will find 70 strips of paper ( or card). You need to glue two ends of two trips of paper together like this:

 With a strip of paper in each hand, cross the ends together and add some glue, hold for 10 seconds to bind together

Keep on folding each strip over each other until you get to the end of the strip, and add a little glue. Trim the ends so the folds are all neat and the same width.

Keep folding until you have 4 folded strips. Glue all the ends together to form a long chain like this:


When you have made 8 or 9 long chains, glue all the ends together. It's then time to start to thread the chains though the rings. 

Before you start to thread through the rings, stretch the chains apart slightly. All you now need to do it thread the long chains through the rings.


By holding the end of the chain in one hand, you need to thread through the wreath in the other hand.


When you have wrapped all the way round the wreath, your ends should meet together where you started, when you have done this, glue the two ends together.


Repeat this process until the chains have all been wrapped around and cover the rings. Continue, to wrap around again like this:


Repeat this process until the chains have all been wrapped around and cover the rings completely.


to decorate, fold your crochet into a big bow, and stick to the bottom middle of the wreath.

That's it, you are now done! 

You can hang them on doors, back of chairs, or hang on walls and beams. We simply added a little nylon fishing wire or ours.

We also sell the kits in brown kraft and vintage cream, and made them like this:


Happy Crafting folks!

Monday, 27 January 2014

Tissue Paper Pom Pom

                                                TISSUE POM POM TUTORIAL


Here is a quick and easy tutorial on how to make tissue pom poms from our pom pom kits available on our website here: http://www.razzledazzlerose.co.uk/tissue-pom-poms-82-c.asp


When you receive your pom pom order, you will have several flat pom poms like this:


The pom poms are pre folded and ready- made for you, we have even added the clear nylon thread for you as well; all you need to do is separate each tissue paper sheet.


Firstly, spread out one end of the flat pom poms, it will look like a concertina. You need to work on one end at a time.


TOP TIP: To make life a little easier, I find sitting the pom pom on a table top or on your lap makes it easier to separate the paper sheets.


Starting from the outside edge, separate and pull back each tissue paper layer like this:


Keep pulling each layer apart from the other– (there are 10 layer in total) all you need to do is separate each tissue paper sheet, by pulling it down away from the other layers until they are all separate. Keep going until the first half is complete. Then complete the same actions again for the second side.


Once you have completed separating the layers on both sides, ruffle or lightly scrunch the inner layers, so the pom pom is completely round and ruffled with no gaps.


That’s it – your done... pull up the clear twine and all you need to do is find somewhere amazing to hang them!

We sell the tissue pompom kits on our website in kraft and vintage cream at the moment, pastel range coming soon!!


Wednesday, 9 October 2013

Vintage Christmas Giftware


NEW Christmas Shop now open!

The nights are drawing in, the central heating is already on, it's time to start your Christmas crafting, AND it's only 77 days until Christmas, 11 weeks or 1848 hours away! 

We have opened our Christmas shop on our website, which is packed with lovely goodies to make such as Christmas flower kits, brown kraft paper bag kits, pre-printed Christmas cards and much more. all our kits are made with recycled materials, and all the matching ribbons are available too, and are supplied to us by Jane Means. We also have all a new tools and materials section with glue, tape and embossing tools.

We hope that we have something on offer to tempt to all. 

Recycled red and Green card pillow boxes 
     
Brown kraft Gift bag kits 


With so many of you buying the poinsettia flower kits from us, we thought it would be a good idea to show you a tutorial on how to make them. 

POINSETTIA FLOWER KIT TUTORIAL 

In your flower kit, you will receive the following:

25 large green Leaves
25 large red petals
25 medium petals
25 mini petals
green foliage

Firstly, if you are using a hot glue gun, switch it on!  Otherwise, incredibly tacky glue is good, and can be purchased in our tools and materials section.

For each flower, you need 1 green large leaf, 1 large red leaf, 1 medium leaf, 1 mini leaf and green foliage. 

To make the flowers you need to add each flower one at a time, starting at the bottom green leaf - and build up one petal at a time, using glue until you reach the small petal for the top.

To make the petals and leaves look realistic, you need to break up the fibres by rubbing in small circles with a embossing tool. (Also available in our tools shop) I used the largest of the round heads for ease of purpose... Using the tool. rub in small circles all over each petal, it will make the leaves curl up slightly, this is how they are meant to look.

 Once you have rubbed all the leaves and petals, you need to adhere all the petals together. By pressing down in the middle of the leaf with your embossing tool in one hand, and your glue in the other hand, add a tiny amount of glue into the middle like this:


 It doesn't matter if you add a little too much glue at this stage, as it won't be shown. Add a petal at a time, adding glue after each layer. 

 Keep going until you reach the final flower, be careful not to add too much glue at this stage when you add the final flower...


Lift the top petals randomly and add a little of the green foliage here and there.. I have added 4 to each flower, but you don't have to add that many if you don't want to!


 Add a little pearl to the centre ( available here ) to complete.
 Finally,leave them to dry for a while, or for a few hours if you are in a hurry! scrunch the leaves up a little more if you want to give a little more character...

Decorate your Christmas gift boxes, gift bags, cards etc! 

Have fun!


Wednesday, 26 June 2013

Vintage Cream Wedding Favours

More Vintage Cream Fleck Card Products ...


Hello Everyone,

Today I thought I would share with you our latest range of recycled products that are now available in our shop. We finally have gift boxes, pillow boxes and CD sleeves available to match our Vintage /cream fleck card.  The vintage cream flecked products are all made from 100% recycled card stock, and match beautifully with our without our brown kraft products.

We were asked to create a range of hot pink and cream wedding stationery for one of our clients, and this is what we came up with.


Here's what we used:

15mm Grosgrain Raspberry pink ribbon from www.Janemeans.com 

Vintage cream fleck CD sleeve with insert card, this was used for the wedding invitation, with the wedding details printed inside the CD sleeve, Vintage cream fleck pillow box, and vintage cream fleck recycled favour boxes, all available on my website here:

15mm hot pink ribbon (jane means.com)

7mm raspberry pink (janemeans.comwww.janemeans.com)

a little natural raffia

50mm Eleganza web ribbon www.michaeldarkltd

Printable tags available here

Vintage cream fleck paper flower kit available here

Hope you like them!  We decided to have a play with some more of our boxes, using other colours from Jane Means Ribbon Range ...


mixed 'raspberry pink' and 'squadron blue' ribbon, 50mm Eleganza web ribbon and handmade paper flower and printable tag ...
just 'squadron blue' with 50mm Eleganza web ribbon and a handmade paper flower...
mixture of both !


Tuesday, 21 May 2013

Gatefold Card Tutorial

                                
                                   SQUARE GATEFOLD CARD TUTORIAL


Hi Everyone,

Today we have been busy designing some new cards for our website, and thought we would share a lovely tutorial with you. We have some new Square gatefold cards and DL size gatefold card kits, both are now available in our shop.

Here we have printed on one of square gatefold card inserts as a wedding invitation, added one of our brown paper doilies and completed the card with some gorgeous wired ribbon from Jane Means (www.janemeans.com) and simply finished with a printable tag and a handmade paper flower.


Print the insert card with your desired birthday message, wedding invitation details or Christmas greeting as above.. 

Use doubled sided tape to adhere your printed insert to the middle part of the card base. 

You then need to add double sided tape to the back side of the paper doilie, and place centrally onto the front left hand flap of the card. 

This is so your card can open and close without the doilie sticking to the opposite side of the card. 

Add your ribbon, and a printable tag with your printed message or wedding date, tie a bow with your wired ribbon, and add a paper flower to finish!
Our Supplies:

Square Gatefold card kit here:
brown paper doilie here:
wired ribbon from Jane Means here:
Recycled paper flower here:


                                                             DL GATEFOLD CARD TUTORIAL 


The same principle applies to the DL gatefold card kits, except you can punch holes to tie your twine or ribbon to the front of your card.


print your insert card and add double sided tape the the back of the card and adhere to the middle of the folded card.

Measure 105mm lengthways in and score a faint line using a braddle on the inside of your card 


and do the same again on the opposite flap.

Measure the width inside and add a score line to meet 15mm, this is where you need to punch your holes on both sides.


Thread your jute twine,or ribbon from the back of the card, and tie into a bow at the front. here we have added one of our printable tag to complete the card.

Our Supplies:

 DL Gatefold card kit here
Recycled paper flower here:
printable tags here

hope you like them!


BLOG DESIGN BY DESIGNER BLOGS